Feisty & Fabulous Festival of Autumn Artwork

Seeking appreciators of the handmade and individual, for attendance at a warm and wonderful pottery fair. Must love unique, interesting and beautiful artware. 

The Potters Guild of NJ Fall Festival and Sale will be going on this weekend at 1459 Deer Path, Mountainside, NJ! See the show and visit me, right-hand side, middle of the room, between 12 and 5 PM on Sunday, November 16. 

No admission fee. 

Posted on November 10, 2014 .

I'm Calling it the "Potters Guild of New Jersey Extravaganza"!

Why "extravaganza"? Because there are over 40 of us potters and sculptors in one big room. That's an extravagant number of personalities and a luxurious surfeit of pottery to see and choose from! 


(Honey jar on the upper right is mine. As always, you can see more of my work on http://www.mimistadlerpottery.com.)

Potters’ Guild Hosts Annual Pottery Festival & Sale  


Where:   Community Presbyterian Church

                     1459 Deer Path

                     Mountainside, NJ 07902

(Mimi's friends: Please note that you can bypass the church entrance and come right through the parking lot to the side door to the right, where the show will be in the large, pleasant social hall. See you Sunday!)


When:    November 15th and 16th, 2014

                   Saturday 11 AM to 5 PM                           

                   Sunday Noon to 5 PM - I will be there in person only on Sunday, 12-5 PM


Highlights: This increasingly popular event draws hundreds of customers from

throughout New Jersey and the tri state area.  Available for sale will be a fabulous

selection of vases, wall pieces, pitchers, teapots, platters, casseroles, raku and pit-

fired vessels in varying colors and styles, and one-of-a-kind sculptures and decorative 

objects of art. The show is the perfect place to find a unique item or gift.


Admission:   Free and Credit cards now accepted! 


Directions:   Route 22 to New Providence Rd, Mountainside. 

                        If going east on 22, cross over 22 at New Providence Rd. 

                        If going west on 22, go right at New Providence Rd. 

                        Follow the double yellow lines up the hill to Deer Path. 

                        Go straight ahead to the church. 


                                For more information please go to PGNJ website:  http://www.pottersguildnj.org


Posted on November 6, 2014 .

Wiring Up, the Possibly Successful Tale of a Partially P.O.'d Potter

Wire. High temperature wire, in fact. It will go to at least 2232 degrees Fahrenheit in the kiln and keep its strength.

I learned about high temp wire from Sandy Simon at the 2013 Women Working With Clay symposium in Roanoke, Virginia. Over several days, I watched Sandy throw vessels with apparent spontaneity yet with evident care as well. One of the things she did was insert Nichrome wire into the lids and sides of vessels to act as knobs and handles. (http://traxgallery.com/category/artist/sandy-simon/) Last time I was at Ceramic Supply, I picked up a package of high temperature wire, thinking of Sandy Simon's work, but not sure where I might use the wire.

Sometimes, at need, something I've learned comes back as a possible solution for a problem I am having in the designing of an object. My chanukiot are a case in point. I had recently been making 8 indentations in the top of each chanukia, each indentation to accommodate either the bottom of a candle or the bottom nub of a glass cup bearing oil and a wick. But the stress to the clay where I pressed the indentations caused cracking in the drying phase of the chanukia.

When I went to load my recently made chanukiot, now dry, into the bisque kiln, I found large cracks in two places. One place was at the point in the body where I'd pushed together the walls of a thrown porcelain cylinder to create the flattened chanukia form.

(You can see the score marks inside the crack, where I pushed the walls together right on the fresh pot on the wheel.)

The other cracking place was on another chanukia, where I'd pressed in the aforementioned indentations on the top plateau.

(This one cracked where the top of the pot came together, and where I made indentations for the candles.)

I went icy calm; I'd put several hours of work into each piece by now, had dried them slowly, and these had now messed with me. I decided at that moment to make two radical changes. First, I would change the clay I use for strongly altered forms like chanukiot, from porcelain to stoneware. (The heck with YOU, porcelain.) Porcelain is too finicky and resists staying altered (it likes to revert to its first thrown state), and it is stupid to keep using it in place of something that is more compliant with a complex form.

So I banished the porcelain and got out some groggy, buff colored stoneware, the kind my students use, that is so much more forgiving than the !?*&!#^ porcelain. I got on the wheel and made three chanukiot, in a burst of adrenaline. I improved the form a bit, too, while I was at it; I threw the new chanukiot on the wheel upside down. The foot was made at the top of the piece this time, with the intent to turn it over to alter it. That way I would have a nice, trim, finished foot. (It's hard to trim a good foot on a piece that's no longer round!) I turned the form over right side up to work on after. I saw right away that the move to stoneware was a good change*.

Second, instead of putting any dents into the top of the first new chanukia, risking stress cracking again, I got out the high temp wire and created one long row of triple loops, evenly spaced from one another.

(Unscientific yet functional measurements for the oil cup/candle placements and low-tech apparatus for hand-forming the wire. I made the loops by hand but started the first one on a nail to anchor it.)

(Unscientific yet functional measurements for the oil cup/candle placements and low-tech apparatus for hand-forming the wire. I made the loops by hand but started the first one on a nail to anchor it.)

In essence, these look like 8 mini springs with a short length of straightish wire between them. They're made of one uncut length. I left extra wire on each end to bend down and stick into the top plateau of the soft clay of the chanukia. I did this for all three chanukiot. I hope this works out to be a good design, because I really like it. My main concern is that glass oil cups (there's a set of them in the box in the photo above) might be heavy for the wire once the chanukia is done. I used 17 gauge wire. 24 gauge is also available, although that much harder to wind into loops.

(Chanukia, wired. You can see the finished-looking foot, which I threw at the top of the vessel first, then turned the completed vessel over to flatten the walls together. This underglazed chanukia has not yet been inscribed with sgraffito, so it is like a blank canvas.)

Will the  clay crack as it dries and shrinks where I stuck in the ends of wire? I hope not. (The wire will be unyielding as the stoneware shrinks around it. I made the insertion holes roomy, but are they roomy enough?) If that happens, this is one more year when I won't have any of these ready for Chanukah. And I did start more than two months ago. My take-away here..? Next time I start SIX months early. 

To bolster hope's springing, I'm making my most logical, educated guesses. The days of leaning on dumb luck are long over. However, the days of this simple material having the last laugh on me are probably not.

My sister in law asked me, "Can't you make a more simple design?" It's not a bad question. The answer is probably "No." I have to design 1) for my aesthetic 2) to give the buyer something special, and 3) taking into account the nature of the clay, underglaze, glaze, and kiln, no small set of variables. Last, 4) I have to design something the buyer will understand and appreciate. Constant accommodation has to be made for all. I have to be flexible, flexible...flexible. I simplify it all to the full extent that I can, and still be able to call the piece individual and handmade. 

Anyway, Sandy Simon, thanks for the inspiration. Here's hoping.

(* I do intend eventually to make a video of this whole chanukia process, once all the steps turn out to be the right ones on a regular basis. It's interesting enough to share.)

Why I Put a Pottery Gallery in my Suburban Home

196 Windsor Way in Hillside, my suburban 1950s neighborhood, is very pleasant. If you've been in a well-maintained New Jersey suburb, you've passed houses like mine plenty of times. It's a white-painted brick ranch with dark red shutters and some shrubbery. But unlike most (if not all) of this plain-variety house, it has a pottery gallery downstairs. If you've read my blog before, you may know about it.  But have you stopped in? It's worth a visit.

(As you come down into the gallery)

The Gallery Downstairs is almost two years old now. It's an unusual business model. The purpose of a gallery is for people to come and see what's inside, and buy if there is something they love and appreciate. But an ordinary house in the suburbs has no volume of people on foot who may come in on impulse.

(Big vase, small teacup)

It's a beautiful exhibit and sale space, with regular-height ceilings and good lighting. As one of my visitors said, "It doesn't feel like a basement!" I've furnished it with pedestals and wall shelves that are almost minimalist, and filled it with several years of work and a few older pieces I've taken from the archives lately. I put new work into it as it is made. 

(Washcups and serving plates)

That it's hidden away is both its problem and its secret charm. It's an art-in-clay surprise, tucked away where you can find it- if you know it's there. Those who do visit are very favorably impressed.

For locals or those who will be traveling nearby, it's worth a drop-in visit. I welcome browsing and, in case you fear pushiness on my part (is it my potter-ly bulging biceps?), I usually enjoy telling you how things are inspired and made, if you want to know about those things, and then let you browse in peace. Think of it as an ongoing pottery craft show with no entry fee. You can come on up and ring the doorbell. I suggest calling 732-492-8558 as well, even if you are already on my front porch, just  in case I am absorbed in work down in the studio and do not hear the bell. Unlike other gallery owners, I will likely answer the door in a clay spattered apron.

(23 mugs and a small blue bowl)

Here is what motivated me to create The Gallery Downstairs.

1985, when I started making pots, is long enough ago that my work has really evolved. Inventory has accumulated well beyond the number of pots I like to take to shows. In the last few years I've created a wider range of interesting pots than ever before. I'm in my most productive phase in my pottery life so far. There are many more pieces that I like than I ever liked before. I want people to see them.

But the shows get harder to do. I have been thinking for some time that instead of packing the pieces up for shows, repacking the unsold ones and unpacking them again to put away in my kiln room "archives", I would create a regular display space for them. So I put together a show that would be up not twice a year, but all year round. 

Psst- Pass it on! It would be very satisfying to "unhide" my little gallery. If you'd just like to come see the work in person and move on, that would be fine, but do pass on the word! And if you need something one of a kind, or if you are going visiting, it's a great place to pick up a gift. Birthdays come up, housewarmings, and engagements. I would be glad to help you find what you want in my Gallery Downstairs. And if you don't see what you would want, we can talk about a custom order, too!


Refreshingly Different Chanukia (Menorah) Designs

 These chanukiot are time consuming, labor intensive, and refreshing.

You are welcome to follow the process:

(Freshly thrown and altered chanukia, made on the potter's wheel and altered, with added shamash)

(Black underglaze coats the unfired chanukia.)

(Underglaze dried; liquid wax was applied and it dried; I then cut designs through the underglaze coat.)

(Underglaze dried; liquid wax was applied and it dried; I then cut designs through the underglaze coat.)

Not done yet! Adding white, chartreuse and red underglazes...

(Chanukiot, still unfired clay, with colored underglaze inlay in some of the sgraffito decoration.)

Now to dry for about 6 days, then put them through the first (the bisque) kiln. More late next week after I glaze them and put them through the glaze fire.

(I think a silent mantra...Don't crack, chanukiot. Don't split, explode, warp or otherwise mock me. Because chanukiot in my studio have a checkered past, but these are the best yet and I'm still optimistic.)

Posted on October 20, 2014 .

Testimonials Wanted!

What an old-fashioned sounding word, "testimonials"!

Do you have a piece I made? Are you willing and able to email a photo and/or a quote? 

As I work behind the scenes on modifications to my website and plans for my business, one small but really nice thing going on is a collection of photos and quotes from owners of my pottery. Would you opt in?

You can be in the photo with the pottery, or not, as you like. Pots in a setting in your home or office would be super. A quote with the photo, from a couple of words to a few sentences, would be really appreciated. A 15% off reward on a future purchase will ensue in short order, in fact, to express appreciation. 

Thank you in advance!


Posted on October 7, 2014 .

Making Work, Planning for a Show

The Gallery Downstairs is filling up with interesting things. Pottery of a fairly individual character doesn't go out of style easily. Sometimes I put away items when they come out of the kiln, and reevaluate them from time to time. I've just done so for the first time in a while. I am now displaying colorful, functional wares of this year and last, and some more monochromatic and sometimes one-of-a-kind pieces from previous years that I like and feel are good enough to present. Some of the vintage pieces are super interesting now that I see them out of the "archives". These are "concept pieces" that are not on my website...yet. They really liven up the gallery and could easily liven up someone's collection!

As we have been since 1995, the studio and The Gallery Downstairs are at 196 Windsor Way in Hillside, NJ. The front doorbell and the side bell both work now, Hallelujah! Our phone number at the studio and gallery is 732-492-8558.

In the studio, I am making pottery for Chanukah. October is a bit late to be making new work for this holiday, but there it is anyway. Last Minute Mim, still at it! Mugs and simple items like that are almost always available for holiday gifts, along with the other objects, and serving platters and bowls (many) that are great for hostess gifts and your own table. They're mostly on my website, and the photos are representative (depending on your screen resolution and color settings), but seeing the work in person and holding it in your hands (yes, it is a "please touch the pottery" shop) really helps you decide more easily what you like.

Update: I'll be showing work in the Fall Pottery Festival and Sale on Sunday, November 16, at the Community Presbyterian Church in Mountainside, NJ, in their large, well-suited social hall. The church is right beside the beautiful Watchung Reservation, in case you want to make it a Pottery Festival + day-in-the-park sort of Sunday. I'll be among approximately 40 potters and sculptors of the Potters Guild of NJ, who are my colleagues and friends. (They will be showing Saturday, November 15th, as well, although my work will be there without me on Saturday.) This gem of a festival is a chance to see all sorts of aesthetic and creative angles on the very varied and vibrant world of clay art. Come, and bring a friend! I'll post an invitation on Facebook at Mimi Stadler Pottery as it approaches.

Another Update: Please go to Mimi Stadler Pottery on Facebook and Follow and Like the page if you haven't already! I'll be posting a "win a mug contest" to break up the February doldrums, with automatic entry only for Followers. 


Posted on October 2, 2014 .

I Opened a New Shop on Etsy!

Last week I was not in the studio per se. I was in my office, working on publicity for my business. I love the artful challenge of making the work, but the challenge of "sending them on to new homes" is pretty large and takes lots of time, too.

I heard that some of you enjoy going to Etsy to browse and shop for gifts. I shop there sometimes myself for unique handmade gifts.

So yesterday I opened an Etsy shop. My own unique, handmade gifts fit the profile very nicely!

My shop has several honey dishes and small, decorative singing birds today, and it will grow as the days pass. This week the honey dishes are there and are duplicated on my website, because it is a short honey season right now. (I also have them right in my gallery if you are near Hillside, NJ. You can stop in. 732-492-8558.) But most of the time, the Etsy shop items will be just on Etsy, like the birds you can see there today. 

I will be among all sorts of other sellers of handicraft on Etsy, as compared to being the only one on my website. I look at Etsy as short term gallery exhibits of my work, changing as sales occur and changing completely every season.

Click on my Etsy shop to go there. Please do consider Bookmarking it into your Favorites so you can easily go back again as I update it! 


Posted on September 23, 2014 .

Browsing for Vases in The Gallery Downstairs

(The display as you enter the gallery. changes frequently)

Come in 10:30 a.m. to 5:30 p.m. most days and be greeted with vases and covered jars among all the other objects of interest. The ones shown above are $28-$65, at The Gallery Downstairs.

Seen elsewhere around The Gallery, more vases among the pots on the shelves:

Come see what other beautiful and interesting one-of-a-kind objects are in The Gallery, too. 

You'll find The Gallery Downstairs side by side with my studio workshop at 196 Windsor Way, (Hillside, NJ). It is through the side door of the house, and, naturally, downstairs. 

Studio workshop and Gallery - 732-492-8558. If I am in the middle of working with clay I will return your call very shortly, so do leave a message!


One Honey Jar Left

One honey jar left- at least till I unload the kiln on September 15th!

$55 at The Gallery Downstairs or on my website.

Posted on September 9, 2014 .

Glaze Phase with Student

End of Glaze Day 3. Two of those days were with a student. Everything was very careful and time consuming as this was a tutorial. She has ideas, and the will to execute them. I have the will to facilitate!

The amount of mopping up, as ever, is prodigious, even though she is the neatest glazer I have ever seen. The mess was mine. I am not neat. I pour the glaze, drip it, brush it; I splash it although I try not to. 

Number of fresh batches of glaze weighed out, put together and sieved 3x each in preparation last week: 3. (Total number of glazes in the studio: 6.) Number of pairs of rubber gloves I went through in three days: 8. Number of finger cots (you know what those are? Super useful for people with beat-up fingers) to protect thumb cuts: 16. Number of sponging forays around the glaze buckets on the floor: eleventy-seven, probably. (Nearly as good as lunges and squats at the gym.) Number of towel and glaze-clothing laundries: two. Dried glaze spatter vacuum efforts: 2. Number of tired, fairly dirty and unquestionably sweaty potters: 1. But I'm kind of happy, too. The kiln is loaded and firing, and will fire through the night. Soon I'll have a few more pieces for the gallery/website.

My student wanted to do blue brushwork on top of the glaze on a couple of pots, so I made a brushing mix for her. I had the recipe for it for over a year, wanting to try it but never getting to it. (Got it from one of Simon Leach's videos. *Recipe below.) I weighed it out and mixed it up in about 5 minutes. A student is a good challenge. I am to have two more students before long, for handbuilding. More excellent challenges, forthwith! 

Number of pots of mine in this kiln: 3 open honey dishes with 3 matching plates, one goblet with matching saucer, two nice vegetable-serving bowls, 2 oblong serving trays, and a whole bunch of student work, carefully glazed.

The load is firing now in my electric kiln. The studio is blessedly, unusually clean.

(*Simon's Blue On-glaze Brushing Stuff 

25% cobalt oxide

25% red iron oxide

25% manganese dioxide

25% crushed dried porcelain

water to mix)


Posted on September 8, 2014 .

Menorahs: Color!

The chanukiot have been underglazed. They are drying, brightening up my dingy kiln room. (They have not been fired yet. If I stood them in a bucket of water, these raw chanukiot would dissolve.) They do not have a clear glaze over them yet, either. 

(Lots of time is spent getting these right. Photo Mimi Stadler 2014)

First, they got a coat of many (underglaze) colors. Then I waxed the whole surface of each one, to protect the colors before the next phase of work. I let the wax dry. That's why they look a bit shiny.

I cut line drawings through the waxed colors with a small, sharp tool, revealing bare clay wherever I incised. Then I inlaid color into the lines I just cut. The wax around the lines resisted the underglaze color I was adding. But the bare clay inside the lines absorbed it. I'm able to create a pretty crisp image with this technique. The wax will burn away in the first firing, known as the "bisque fire", which goes to about 1860 degrees Fahrenheit. Then I'll cover the chanukia with clear glaze, and fire it to 2230 degrees Fahrenheit. (More photos then.)

The third one hasn't had its sgraffito treatment yet. It just has a base-coat of colors that remind me of a sunset:

(Photo Mimi Stadler 2014)


Posted on September 4, 2014 .

Chanukah Menorahs Get Decoration

Here are those three wheel-thrown chanukiot (Chanukah menorahs), still raw (unfired) clay, with first layers of brushed underglaze color applied, and the beginning of incised decoration and inlaid underglaze color.

(Right rear, no underglaze yet; Left, underglaze, not yet incised; Front, underglazed, partly incised and inlaid, not yet inlaid with the rest of the colors. photo Mimi Stadler 2014)

(A view from the top.)

I am experimenting with everything: forms, colors, top accommodations for glass cups or candles; angles of shamash (that candle doohickey on the front) placement, whether the clay will crack during drying and/or firing due to uneven stresses of drying at attachment points...much could go right, and (I hope not) much, wrong. In short, these are creative and risky times hereabouts.


Posted on September 2, 2014 .

Chanukah Menorahs Made on the Potter's Wheel

You recall this from 2 posts ago... a stoneware chanukia (also spelled "chanukiah" or "hannukia", meaning Chanuka menorah) seen at the Ha'aretz Museum in Ramat Gan, Israel.

(Chanukia, collection of the Ha'aretz Museum, Ramat Gan, Israel. Traditional Lions of Judah brushed cobalt decoration and white glaze, over dark stoneware.)

It looks relatively simple, so I've been trying variations this week on the potter's wheel. Here are the steps involved in my third variation on this design. This one is the best so far.

Start with 8 lbs of clay.

(Kneading up 8 lbs. of clay is very good exercise for your arms.)

Separately, roll and flatten a thick coil, and impress it with 8 indentations, to be deepened and widened later after attaching to the chanukia. Set aside to firm up a little. (It will be cut to fit later.)

(Starting the top of the chanukia.)

Throw a cylinder (here, 11" tall and fairly narrow at the rim). Score (scratch) and slip (moisten with liquid clay) the cylinder a few inches down on the inside.

(11" tall cylinder, about 6.5" wide at the mouth. Note: Don't use a lot of water when raising and thinning the cylinder walls.)

(11" tall cylinder, about 6.5" wide at the mouth. Note: Don't use a lot of water when raising and thinning the cylinder walls.)

Carefully bring the sides of the cylinder toward each other, pressing them together at the score marks and upward, and gently pressing inward the belly below that, too. The goal is to have a flattened oval profile and a closed rim. 

(Beginning the cylinder squash.)

(Squashed cylinder with closed rim. Maybe I should've made the top section thicker, not sure.Should have scored the entire interior wherever the sides will touch, too. Next time.)

Time to add a top: Slip and score the top and sides of the pressed-together cylinder rim, and do the same to the underside of that chanukia top that was made earlier. Drape the pre-made top over the pressed-together rim. Carefully press down to attach the parts, taking care not to mess up the indentations on the top surface where glass oil cups will go. Pinch the sides and bottom of the new addition together at intervals to really get a good join. 

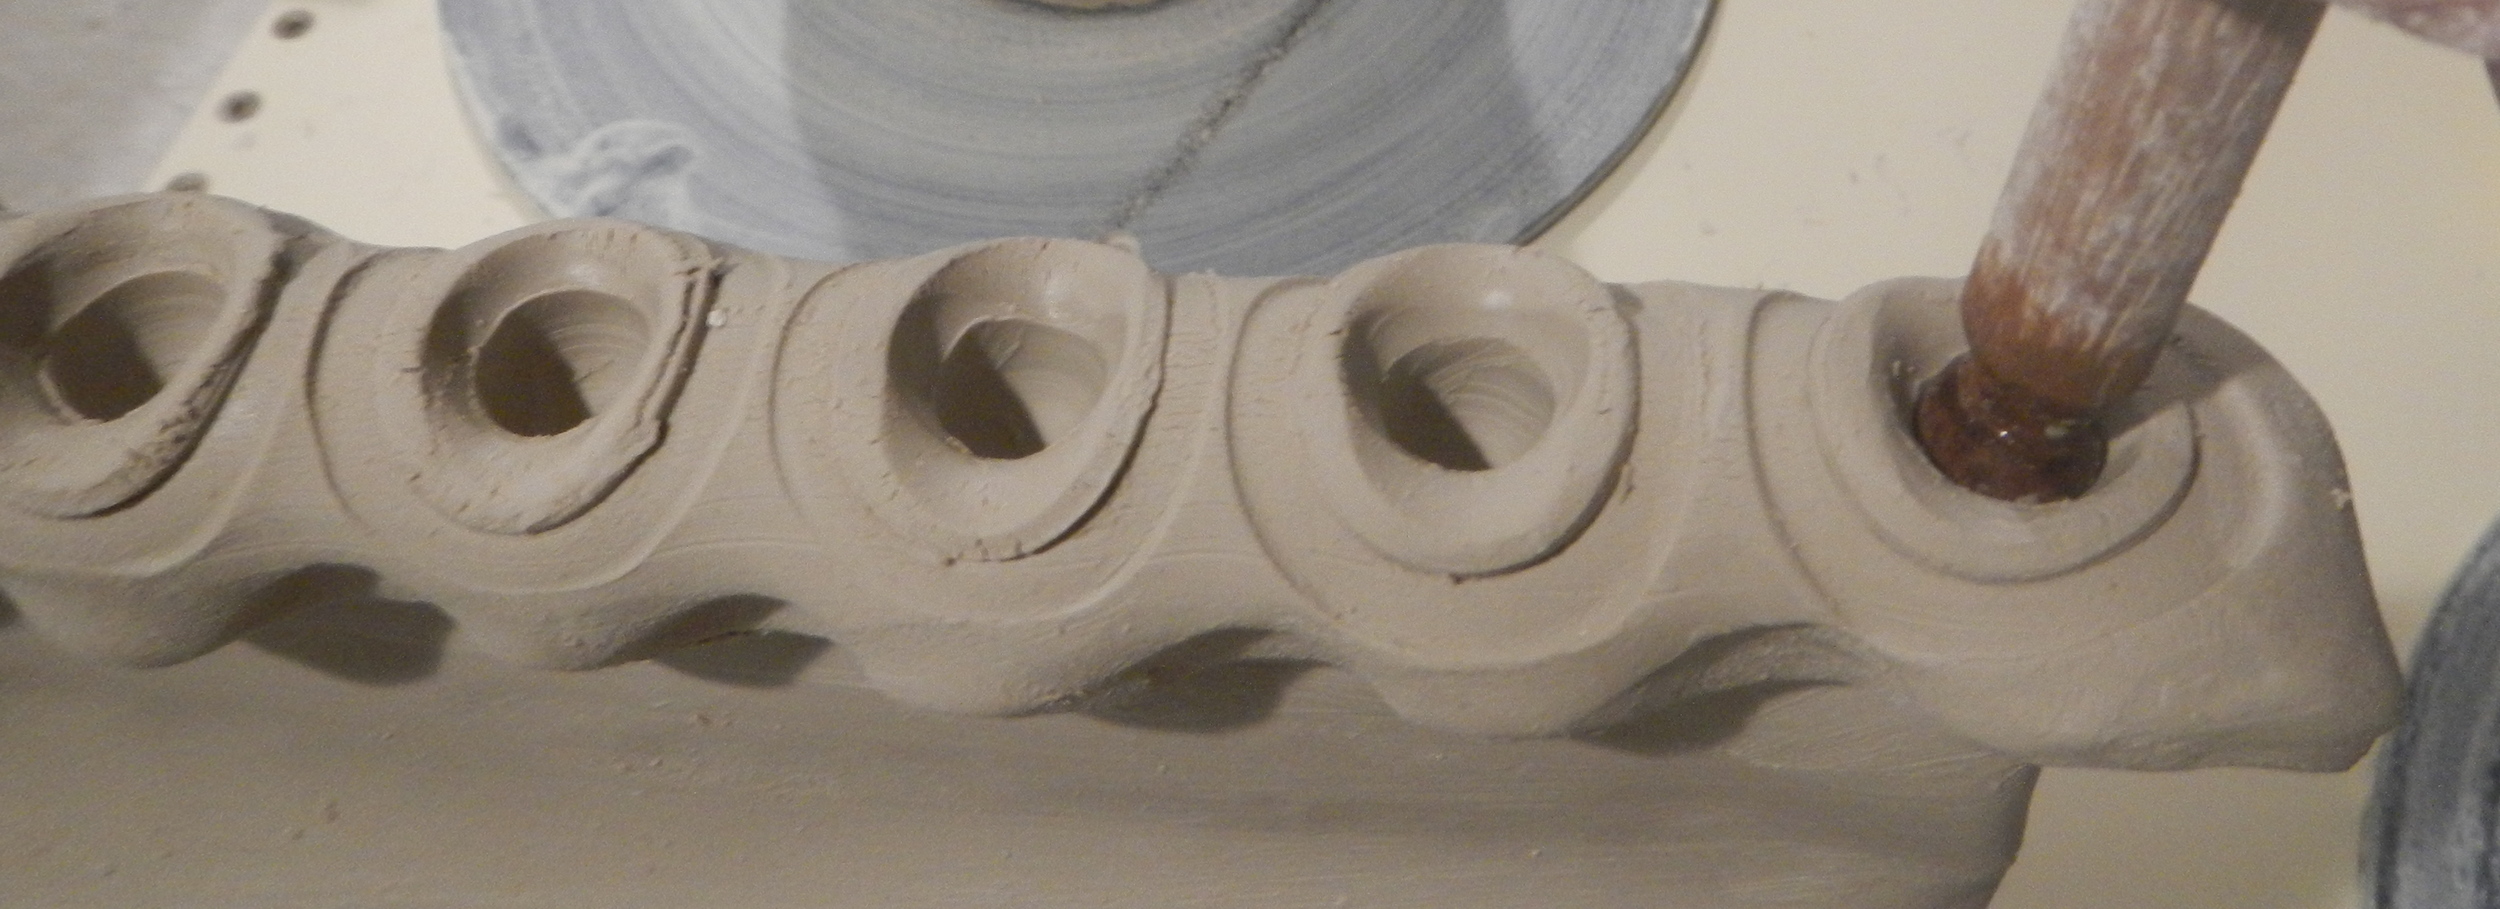
Now deepen the indentations where the glass oil cups will sit. The glass cups have a little nub on each bottom that sits into each indentation.

(Deepening the indentations in the top of the chanukia, using a small stick with a round end that's been sprayed with WD40 motor oil to prevent sticking. These indentations will accommodate the bottoms of glass oil cups.)

(Deepening the indentations in the top of the chanukia, using a small stick with a round end that's been sprayed with WD40 motor oil to prevent sticking. These indentations will accommodate the bottoms of glass oil cups.)

Make a tapering coil, pull the end a little to make a tail, score, slip, and attach. Hollow it out after to accommodate a shamash candle.

(Adding a coil to be the shamash holder.)

(Close-up of the shamash holder. I will clean it up a bit when it has firmed further.)

Here is the sum of those parts, so far.

(Freshly made chanukia, to be cleaned up after firming to soft "leather hard." It is 11.5" tall in the raw state.)

(Freshly made chanukia, to be cleaned up after firming to soft "leather hard." It is 11.5" tall in the raw state.)

When it has firmed up quite a bit, I will do some colored underglaze brushwork to decorate it.

I made all of this at one go, throwing, altering and adding clay. It's a pretty spontaneous process that depends on everything being done right the first time. You can't fuss or fiddle with it or it will look messy at best, and collapse at worst. This one was a little fussier and fiddlier than I wanted, but not too terribly so.

I'll continue to tweak this design different ways and see what happens. 


Clay Sculpture at the Israel Museum

If you've followed my blog since back in 2009, you may have seen photos of one of my sculptures. It hangs out in my Gallery Downstairs nowadays. It comes with a story...

And I have made other figurative sculptures as well. But it has been some years since I worked that way.

At the Israel Museum in Jerusalem a week ago I came across this terra cotta young lady, reading, as bourgeois young ladies in the 1870s were sometimes depicted. By Aime-Jules Dalou. 

The guard did not mind when I got out my camera, so I walked all around and photographed her from various angles; sitting on her chair, engrossed in her book, all alone in her museum case. The clay (terra cotta is earthenware) was roughly modeled, yet she is remarkably lifelike all the same. Her face is smooth. She is as fresh a subject as if the model had just sat for the portrait last month.

(Woman Reading, 1874, by Aime-Jules Dalou. Collection of Israel Museum, Jerusalem)

From her tilted-up shoe to her engrossed reading, she is the very symbol of poised absorption.

I don't know if I'll do figurative sculpture again anytime soon, but this young lady makes me remember how exciting and fun it was, and how the hours flew while I worked with the clay in this way. 

Posted on August 21, 2014 .

Chanukia Quest

Chanukia- (definition) a Chanukah menorah. Sometimes spelled chanukiah. Plural: chanukiot.

It's been a long and varied effort over the past 29 years to make a well-designed and great-looking chanukia out of clay. So far, my efforts have been pretty amateur. 

Last week I saw some chanukiot in the Ha'aretz Museum in Ramat Gan, Israel. These are inspiring chanukia design thoughts again.

One was brass, by L.Y. Wolpert, from the 1950s. The petal aspect of the backsplash to the candle holders is great. The thing is so cute I want to give it a little hug.

(L.Y. Wolpert brass chanukia, 1950s. Ha'aretz Museum, Ramat Gan, Israel)

(L.Y. Wolpert brass chanukia, 1950s. Ha'aretz Museum, Ramat Gan, Israel)

Another brass chanukia I really like is this 1950s design, made to look like two olive leaves. This is right where my comfort zone lies, simple organic imagery crossed with functionality.

(Brass chanukia, ca. 1950. Ha'aretz Museum, Ramat Gan, Israel. Attributed, with a question mark, to Ya'alat Chen)

(Brass chanukia, ca. 1950. Ha'aretz Museum, Ramat Gan, Israel. Attributed, with a question mark, to Ya'alat Chen)

There was one ceramic one, as well, made from a thrown and altered bowl. I am thinking about how to throw this to accommodate oil instead of candles. 

(Stoneware or earthenware chanukia, made from a thrown and altered bowl, by Hanna or Hava Samuel of Kav Vasefel Ltd, ca. 2000. From the collection of Ha'aretz Museum, Ramat Gan, Israel.)

(Stoneware or earthenware chanukia, made from a thrown and altered bowl, by Hanna or Hava Samuel of Kav Vasefel Ltd, ca. 2000. From the collection of Ha'aretz Museum, Ramat Gan, Israel.)

August is the time- even kind of late- to think about things one will want to have finished by November.


Posted on August 20, 2014 .

This Kiln is For the Birds...

It's a bit of an ongoing jigsaw puzzle loading a bisque kiln. The pieces can touch, can fit lip to lip if they are of similar size, and small pots can fit between stacks of large ones. It's absorbing to figure out as it goes along, but it is SO unexciting it isn't funny.

Conversely, I do not seem to be able to load a bisque kiln often enough. New work! I want to see new work! But my pace is not the speediest. Also, it's been so humid that drying is going like the proverbial tortoise. I have a dehumidifier going in the kiln room where the rack of ware is standing. But still.

Some weeks are like that.

Drying their underglaze feathers on my slab roller table and socializing are a flock of new birds.

(Porcelain birds with underglaze colors, drying before being put into a bisque kiln. Photo: Mimi Stadler)

They will sit between the pots in the bisque kiln wherever there is space.


Posted on August 4, 2014 .

Kitchen Utensils in the Studio

Kitchen stuff that came downstairs:

Can punch

(another fine tool for making interesting marks in the fresh clay)

Spatula

(very useful for cleaning the interior of the glaze bucket)

Measuring cup

(people often want to know just how much each goblet holds)

Food scale- like all the rest, not hereafter to be used for food!

(1 lb. of clay makes a nicely sized, useful bowl.)

Scrubbies 

(great for washing out glaze pouring vessels and  tools)

Cake frosting decorative-edge thingies

(holding one of these against a pot that is revolving on the wheel, I can make neat or interesting indentations)

Worn out kitchen towels 

(old towels, aprons, and worn out shirts- perfect for studio use)

Yogurt cups

(I also use smaller yogurt containers as hump molds for kids to hand build vessels around)

Random texture items to make attractive impressions in clay 

(bubble wrap, a piece of vinyl table liner, and some orange stuff the contractor left)


It's a challenge NOT bringing all sorts of things to the studio to use or try out. I do meet the challenge. I need more room to work than to store things that turn out to have no function. But still, you never know when a texture opportunity will arise- so tempting to store some more lace...in case.

Posted on July 31, 2014 .